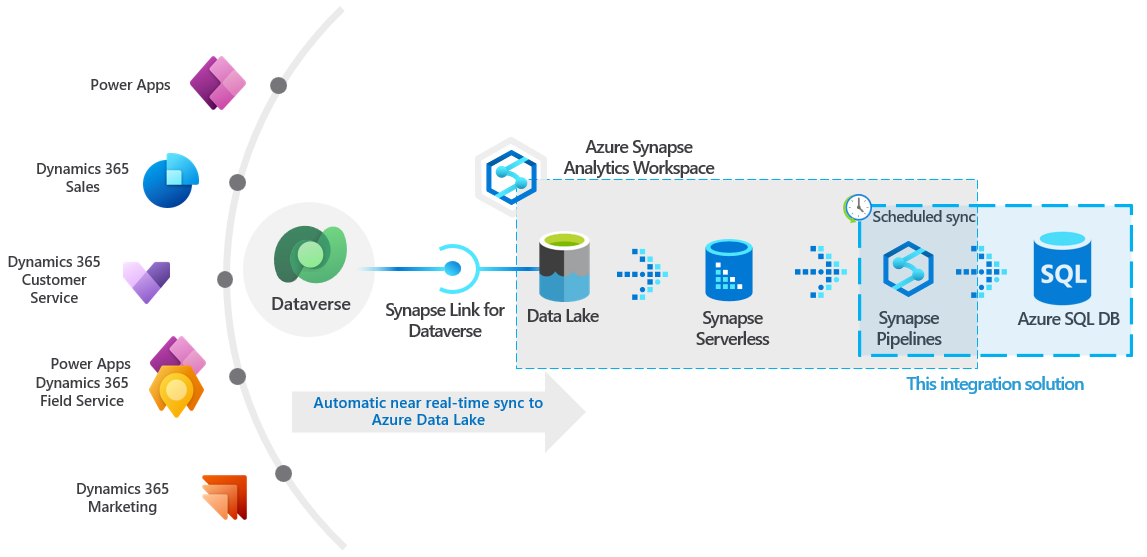
In today's data-driven world, efficient synchronization of data between various platforms is crucial for organizations to gain meaningful insights. Recently, I had the opportunity to work on a project that involved automating the data sync process between Microsoft Dataverse and Azure Synapse Dedicated SQL Pool.
In this blog post, I will walk you through the steps I took to achieve seamless data synchronization and how it streamlined our data analytics workflow.
However, manually transferring and synchronizing data between these two platforms (Dataverse and Synapse Dedicated SQL pool) was time-consuming and prone to errors. To address this challenge, I set out to automate the data synchronization process.
Data Flow and Automation:
The first step in automating the data sync was extracting data from Dataverse and storing it in Azure Data Lake Storage. I leveraged the power of Azure Synapse Link for Dataverse, which automatically syncs data between Dataverse and ADLS Gen2. Once the data was available in Azure Data Lake Storage, it was automatically synced with the Lake database by linking ADLS Gen2 with Azure Synapse Analytics.
To ensure that the data sync process was fully automated, I configured a trigger that would automatically initiate the pipeline whenever new data arrived in the Synapse Lake Database.
Steps:
In Power Apps:
⦁ Click on the Azure Synapse Link to create sync between Dataverse and Azure Synapse/Data Lake Storage.
⦁ Mange Tables: Add all the tables you need to be synced.
⦁ Create. (This would take 2-5 minutes.)
In Azure Synapse Analytics:
⦁ Create a data flow between Azure Synapse Lake Database and Azure Synapse Dedicated SQL Pool.
⦁ Add Source: In the Source blade click on “Workspace DB” for “Source Type”, then select respective “Database” and “Table”
⦁ Click on the “+” button on the “dataflow” Look for “Alter Row” click on it.
⦁ Alter Row: Add conditions If you want to only upsert the new rows that are not in the “Dedicated SQL pool”. Then add condition like “Delete if” or “Upsert if”.
⦁ Add Sink at last and select “Inline” for “Source Type”, then select/Create a linked Service for Azure Synapse Dedicated SQL Pool. At last, select the database and table.
Publish pipeline:
⦁ Open Integrate Tab and create a new pipeline.
⦁ In new pipeline, exapand "Move and Transform".
⦁ Drag and drop Dataflow. Select the dataflow that you created earlier.
⦁ Publish your pipeline.
Trigger:
⦁ Click Add trigger+ button and click new/edit and create a new trigger.
⦁ Select Storage Events for trigger type and specify the storage account and blob path and specify the event.
⦁ Publish your trigger.
Now you can see the pipeline run when a blob is created/ deleted in the ADLS account.
In conclusion, automating the data synchronization process between Dataverse and Azure Synapse Dedicated SQL Pool was a game-changer for our organization. It not only saved us time and effort but also provided us with a reliable and up-to-date data analytics environment. The power of Azure's integrated services made this task achievable and opened new possibilities for our data-driven decision-making process.
On-Time Shipping = DIVIDE(CALCULATE(COUNT('Table'[Order]),'Table'[Difference]>=0),COUNT('Table'[Order]))
